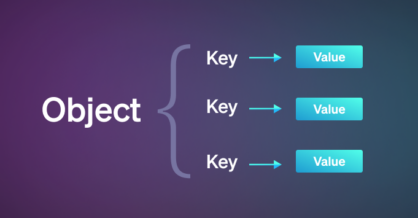
How to Get an Object’s Keys and Values in JavaScript
In JavaScript, getting the keys and values that comprise an object is very easy. You can retrieve each object’s keys, values, or both combined into an
In short, a promise is JavaScript’s way of telling us: “I’m on it. When I’m done, I’ll send you the result”. It is an assurance that the calling thread will receive a result at a later point in time. This assurance allows the main thread of execution to continue, instead of needing to block the execution’s progress until the method being called returns properly.
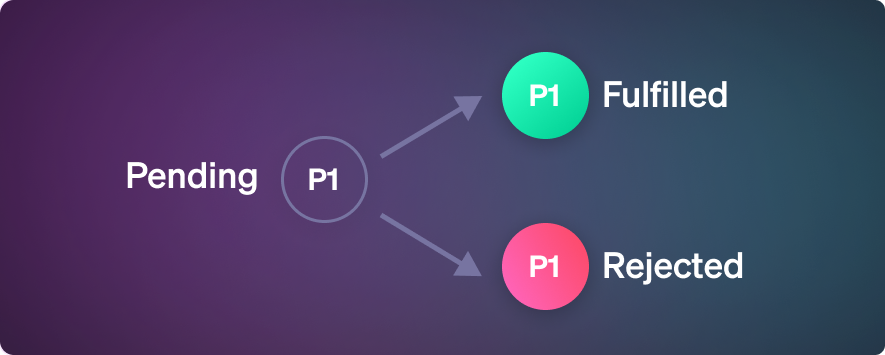
A promise has three states – one initial state and two end states:
- pending – This is the initial state. This state indicates that the request is pending, and leads to one of the other two states upon completion.
- fulfilled – This is an end state that indicates that the operation was completed successfully.
- rejected – This is an end state that indicates that the operation has failed.
The syntax for a promise is straightforward. First create a promise using the keyword new along with the keyword Promise (with capital P). Next, provide a callback function as a parameter – this function will handle the two possible end states: fulfillment or rejection. The syntax below demonstrates how to use a Promise:
const promise = new Promise((resolve, reject)= > {
// Additional statement (s) here
resolve(resultOfSuccess)
reject(resultOfFailure)
}
This syntax uses an arrow function as the callback. Other than the variable name, no changes are required here. You can optionally provide statements to execute as a part of this function. These statements should work to determine the required resolution of the action taken – this can be a condition, a URL to connect to, or any other statement that supports the promise’s resolution. Results are returned by calling the resolve() or reject() parameters with one of two values:
resultOfSuccess: the return value in case of a successful execution.
resultOfFailure: the return value in case of a failed execution.
Next, we’ll explore these concepts with some sample code.
Imagine that, for some reason, you wanted to write a calculator that only works half of the time. In code, a “bad” calculator might look something like this:
function badCalc(num1, num2) {
    return new Promise((resolve, reject) => {
        if (Math.random() > 0.5) resolve(num1 * num2);
        else reject('Oopsy...');
    })
}
function getMul() {
    for (let i = 0; i < 50; i++) {
        console.log('i=', i, badCalc(i, i + 1));
    }
}
getMul();
In the above code, badCalc() returns a promise. Therefore we have a guarantee to get a value back, but it won’t always be the product of num1 and num2. This is because this promise is set to resolve (or fulfill) in approximately half the cases, while it will fail (or reject) in the other half of cases.
When the function is successful, you will receive the expected result: i= 20 Promise {<fulfilled>: 420}. In the case of a failure, though, you’ll see a rejected promise: i= 23 Promise {<rejected>: “Oopsy…”} returned. In both cases the result is wrapped up in a promise object, from which we will need to extract the return values. In our fulfilled case above, this means we can’t use the result in further calculations – adding “7” to the result of badCalc (“420”) will not work because we are not working with objects directly. You can see this happening in the following code:
console.log('i=', i, badCalc(i, i + 1) + 7);
//expected output: i= 20 [object Promise]7
In the above code, you can see that the value “7” is simply appended as a string to the promise object’s string output value, which is definitely not what we intended. This is due to the result of badCalc being a promise object, rather than the numeric result we were hoping to see.
Asynchronous functions enable us to work with promises and their resolution.
There are two ways to handle promise results:
- .then(), which is called as a callback upon completion of the promise
- async / await, which forces the current thread of execution to wait for the promise to complete
This page focuses mostly on the second option. It’s newer, it’s cleaner, and it’s a lot more readable. But first, we’ll review the callback pattern, which is implemented using .then().
The following example shows how to use .then() to handle promises and promise resolution:
function getMul() {
    for (let i = 0; i < 50; i++) {
        let res = badCalc(i, i + 1).then(res => console.log('i=', i, 'res: ', res + 7));
    }
}
getMul();
The above code demonstrates how to use .then() so that you are able to use the return value of badCalc() without needing any extra steps. We simply store the return value in a variable, res. This allows us to operate on that value later using the .then() method.
.then() takes a callback function as its argument. In the above example, res is being passed as a parameter to this callback. Using console.log(), you can see that res is of type Number. This makes it possible to use the result directly, letting us add 7 to the value without running into the type issue we encountered before. The expected log output of the above function with an argument of i=0 would be: i= 0 res: 7.
However, the log is only displayed for the “good” calculations – function calls where the promise resolution is fulfilled, or successful. We need to add a bit more code to handle the rejected case and allow for our “Oopsy…” string to be printed. To accomplish this, we need to tell our .then() handler what to do with rejected promises. The following code shows how this is done:
function getMul() {
    for (let i = 0; i < 50; i++) {
        let res = badCalc(i, i + 1)
            .then(res => {
                console.log(i, res + 7);
            }, failure => {
                console.error(failure); //expected output: Oopsy...
            })
    }
}
getMul();
In the above code, in case of a successful operation, (res + 7) will be printed to the console, and “Oopsy…” will be printed to the console when the operation fails.
Note: the word ‘failure’ in the above code sample can be changed to any other word, it establishes a promise resolution similar to the result handler above, creating a function with a single parameter named “failure” that will contain details on the error encountered.
The above provides the basics of using the .then() syntax for handling promise resolution. Next, let’s take a look at using the async / await syntax.
The async-await syntax helps with readability, allowing you to write asynchronous code as if it were following synchronous call patterns.
To enable this method of communication, you’ll need to modify your function prototype. In the declaration of the function prototype, before the word ‘function’, add the keyword async. This signals to JavaScript that this method will handle promise resolutions.
Next, we edit the function itself to add the keyword await to our asynchronous function call. This keyword tells JavaScript what to wait for when it is processing, and when the execution thread reaches this line the call will block until the promise is resolved. When the value is returned from this asynchronous function, the function code will continue its execution as normal. Other parts of your application’s code are unaffected, and continue running without issue. That’s asynchronous programming in a nutshell!
Syntax
Here is the general syntax for using the async / await promise resolution method:
async function name (parameters) {
// Your statement(s) here!
}
The syntax above has the following components:
- name: the name of the function
- parameters: the names of arguments to be passed to the function
- statements: the body of the function where the await mechanism can be used.
The following simple example adapts our badCalc() handler to work properly with the async / await pattern:
async function getMul() {
    for (let i = 0; i < 50; i++) {
        try {
            let res = await badCalc(i, i + 1);
            console.log('i=', i, 'res: ', res);
        } catch (error) {
            console.log(error);
        }
    }
}
getMul();
In the above example, the word async was added to the getMul() function declaration. Inside the function’s scope, await appears before badCalc(), telling JavaScript to await the result of this call before moving on. The return value received is the value we need for the following console.log() statement.
The above code uses the try and catch keywords. These are used to manage exception handling, giving us additional flexibility when working with functions that may throw an error. Let’s explore these keywords in a bit more depth.
We’ll start with try , which tells the function “try to run the following code.” The statements in this block are executed as any other code block would be, until the code either completes or encounters an error.
If the code encounters an error, the catch block is invoked to handle it. The error is then “caught”. An error that is “caught” is regarded as a “handled error” in JavaScript , and the code will be allowed to continue despite the handled exception. In the example above, about half of the attempted calls to badCalc() will be rejected. Without the catch block, the function will fail with the first error, halting the execution of the code at the point of failure and likely bringing down the entire application as a result.
Try…catch blocks are very powerful, and should be used whenever dealing with promises as, unfortunately, not all promises are fulfilled. The try…catch block allows us to handle these unfulfilled promises gracefully, allowing the code execution to continue uninterrupted.
In the code above, a “good” return value from badCalc() will print i= 11 res: 132 to the console. In the event of a failure, the catch block above will print our Oopsy… error message to the console.
Many functions require multiple data calls to pull in all the information needed to perform a given task. The function itself cannot continue until it has all of the information it needs from the dependent asynchronous functions. Think of these situations as being like a party that can only begin when all of the invited guests have arrived. Promise.all() allows us to manage this complexity.
Let’s explore this with an example. In our example, we cannot begin the party until all three of the invited guests have arrived. In the following code, we illustrate this concept with four functions. We have a function for each guest that codifies their arrival at the party, and a marshalling function that handles the execution needed once all three party attendees have arrived:
function person1Arrival() {
    return new Promise((resolve, reject) => {
        setTimeout(() => {
            resolve('Person A has arrived!')
        }, 2000);
    })
}
function person2Arrival() {
    return new Promise((resolve, reject) => {
        setTimeout(() => {
            resolve('Person B has arrived!')
        }, 500);
    })
}
function person3Arrival() {
    return new Promise((resolve, reject) => {
        setTimeout(() => {
            resolve('Person C has arrived!')
        }, 3000);
    })
}
async function party() {
    const [a, b, c] = await Promise.all([person1Arrival(), person2Arrival(), person3Arrival()]);
    console.log(a, b, c);
    //expected output: Person A has arrived! Person B has arrived! Person C has arrived!
    console.log('Party is On!!');
    //expected output: Party is On!!
}
party();
In the above example, each arrival function runs with a custom delay. Person A arrives after 2 seconds, person B arrives after 500 milliseconds, and person C arrives after 3 seconds.
As party() is an async function, both console.log() statements will occur after person C arrives, or 3 seconds after the request was made. We catch all of these promises using the await keyword, and provide all of our promise-generating functions as an array argument to Promise.all(). The code only continues when all promises have been completed, and the results are stored in variables a, b, and c respectively.
You can perform the same task using only a single return value, instead of an array of three return values. To do so, use the following syntax:
const waiting = await Promise.all([person1Arrival(), person2Arrival(), person3Arrival()]);
This code produces a similar result to the first set of example code, but faces a couple issues. First, it will not be able to log individual results from each of the aggregated promises. Secondly, it will not provide any return value to the variable ‘waiting’. This approach prevents you from using the values returned from the promises that are being monitored.
Note: Promise.all() receives an array of promises as its parameter. Promise.all() resolves all of the promises, so there is no need to use try…catch functionality here.
Syntax
The Promise.all() method has the following syntax:
await Promise.all(array of promises)
Promise.all() requires that you pass in the promises to be monitored as an array. Each item in the array is a promise that needs to be resolved. In the example above, we pass in an array with all three of our invitee functions, each containing a promise. This gives us the array of promises that Promise.all() is looking for. Promise.all() then waits for the three promises to complete, returning their results once the promises have resolved.
Related Articles
JavaScript – How to Use setTimeout
In JavaScript, getting the keys and values that comprise an object is very easy. You can retrieve each object’s keys, values, or both combined into an

The Assignment operator is used to assign a value to a variable. Assignment (=) The assignment operator simply assigns the value of the right operand to

The for…in statement is used to loop through an object’s properties. Basic for…in loop example The following code demonstrates a basic example using the for…in statement